Use the Activity Grading View
Jump to section
Once you've entered the Activity Grading View of the Grade Manager, you can review and edit your students' grades for the current version of a specific activity.
NOTE: You can only use the Activity Grading View for 1 activity at a time. Lessons, mastery assignments, and adaptive assignments can't be viewed with the Activity Grading View.
TIP: Check out Access the Activity Grading View to learn about how to make this feature available from a Gradebook search.
Grades that have been automatically awarded by Möbius can be reviewed and edited using the panes and functions of the Activity Grading View.
All of your manual grading tasks can also be performed from this view.
TIP: You can still perform the review and edit of automatically graded questions and manual grading using the traditional Gradebook interface. Check out:
IMPORTANT: Assignment regrading isn't applied to questions that have been manually graded or have had their grades manually adjusted. Check out Perform manual grading for more information on manually editing grades in the Gradebook.
Activity Grading View overview
Once you've entered the Grade Manager, the Activity Grading View is displayed:
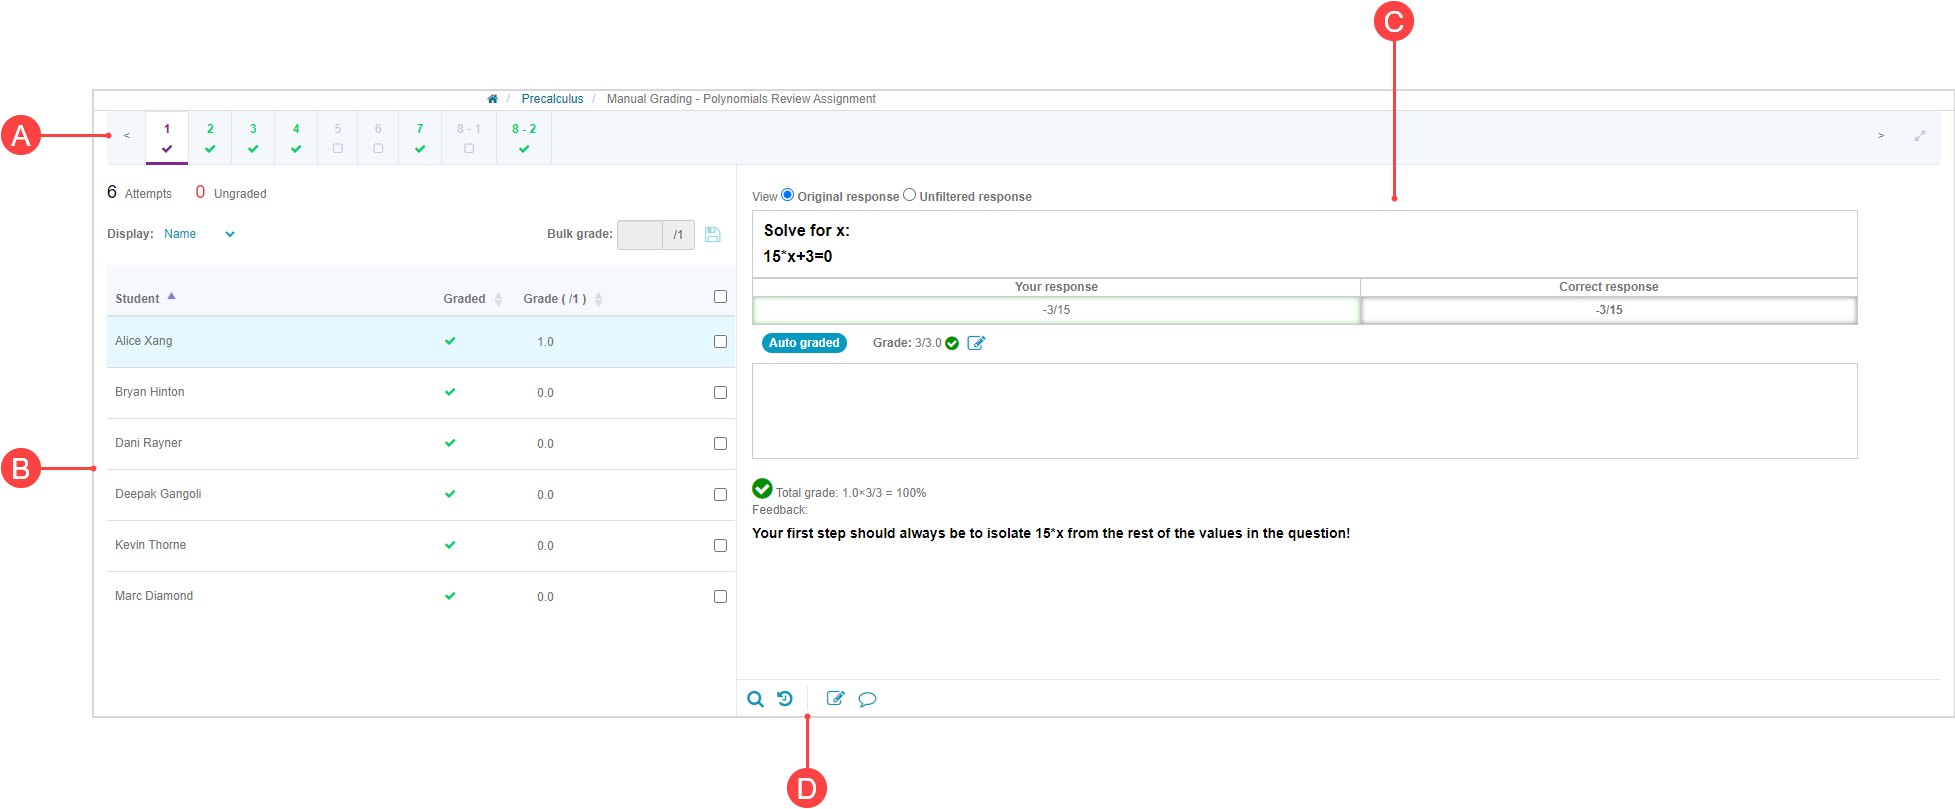
A. Question pane — Displays the questions used by the current of the activity and their graded status.
B. Selection pane — Displays question-specific data and student attempts for the question selected from A.
C. Details pane — Displays the response for the attempt selected from B.
D. Grading Manager tools — Tools within C that allow you to preview the question, view grade history, add comments, and edit grades.
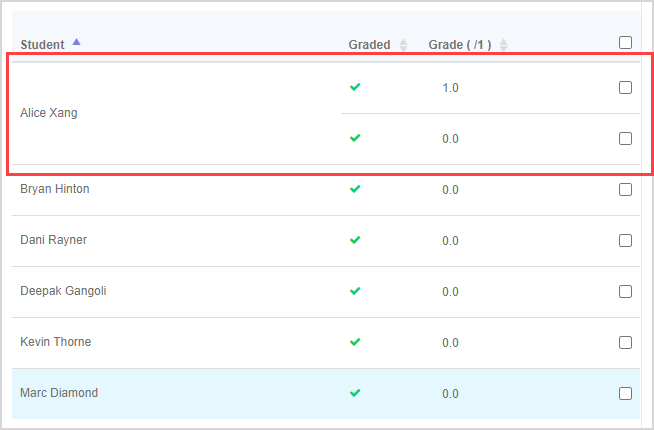
NOTE: Each student attempt is displayed as its own row in the (B) Selection pane. If your Gradebook search criteria include a student with multiple attempts at the activity, each attempt is listed in its own row for that student. You can then view each individual attempt for that student.
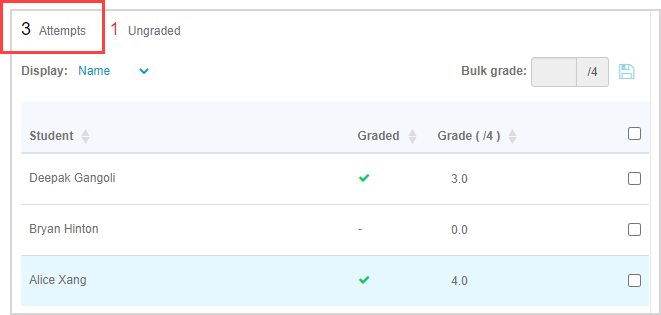
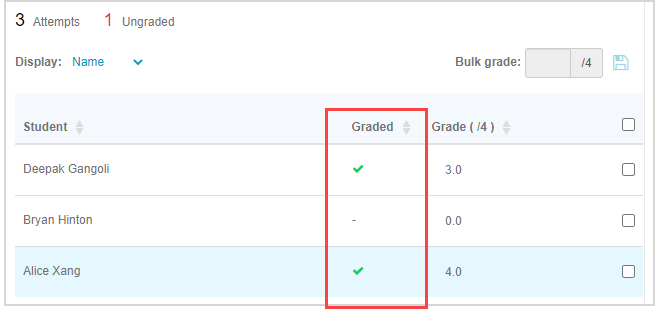
NOTE: The (B) Selection pane provides summary information about the graded status of your students' attempts:
- A numerical summary indicates the total number of attempts at the question.
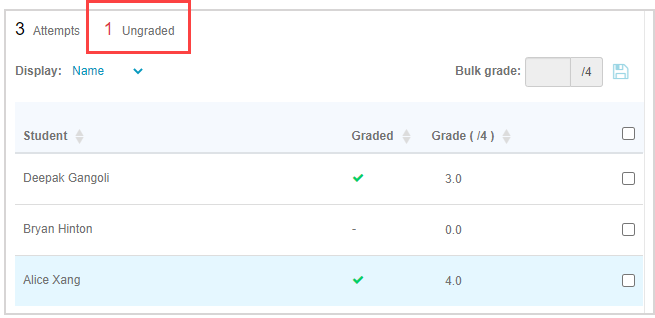
- A numerical summary indicates how many attempts at the question require manual grading (which updates when manual grading is performed).
- The Graded column indicates which specific attempts are considered fully graded
 or still require manual grading
  (which updates when manual grading is performed).
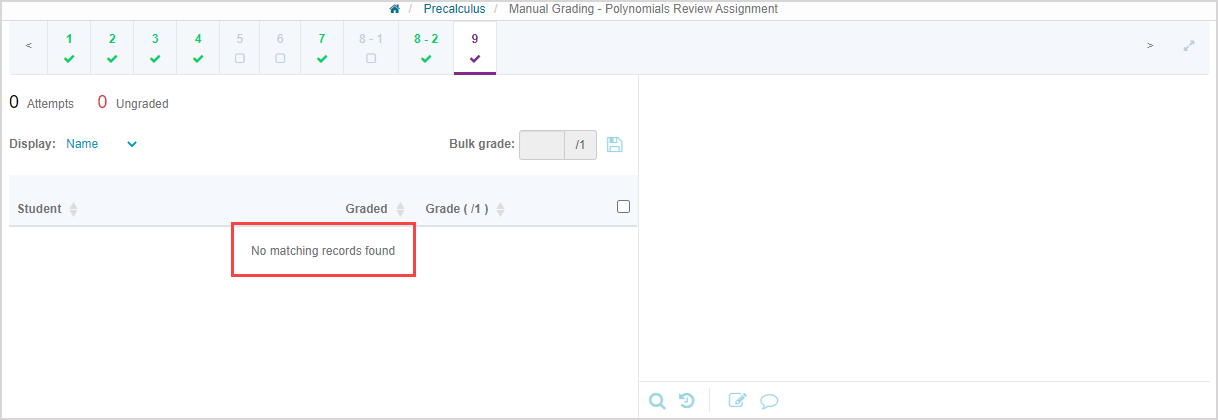
NOTE: If a question wasn't seen by your students (Example — it was added to the activity after your students have already submitted their attempts), no attempt rows will be displayed in the (B) Selection pane and a message appears stating: No matching records found. The question's graded status in the (A) Question pane is auto-graded and considered fully graded.
Navigate between questions
The Question pane displays all questions within the activity and allows you to navigate between questions for review and grading tasks.
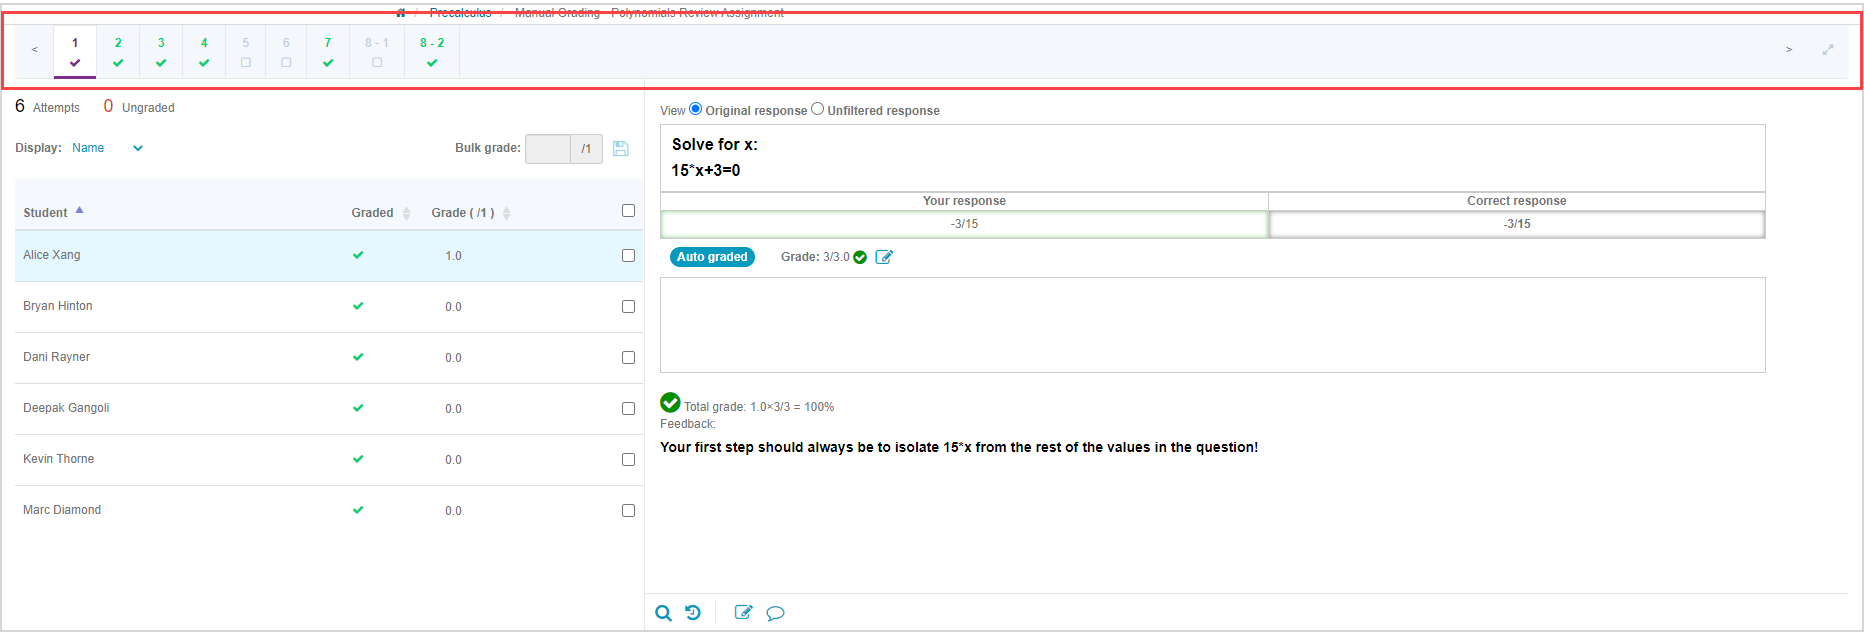
Use the navigation arrows to scroll between questions that aren't in view if your activity has more questions than can be displayed in the Question pane.

TIP: Press Shift + A to navigate to the left or Shift + D to navigate to the right within the Question pane instead of clicking the navigation arrows.
Selecting a question from the Question pane:
- Highlights the selected question with an underline (and changes it to purple).

NOTE: Only 1 question can be selected at a time.
- Causes the Selection pane to display all student attempts at the selected question.

The Question pane also displays the graded status of the questions within the activity:

A. Automatically graded  — The question has been automatically graded by Möbius and is considered fully graded.
B. Requires manual grading  — The question has at least 1 student response that still requires manual review by an instructor.
C. Manual grading complete  — All responses for all attempts at the question have been manually reviewed and is considered fully graded.
NOTE: Questions from within a question group are displayed with a hyphen. Example — 8-1 and 8-2.
Change the display
You can change the display of the Activity Grading View in several ways:
- Click expand
 in the Question pane to remove the Möbius header to give you more screen space to perform your grading tasks.

TIP: Click collapse in the Question pane to restore the original view that includes the Möbius header.

- Click the Display drop-down list to select what user information you want to be displayed as the student identifier in the Selection pane.
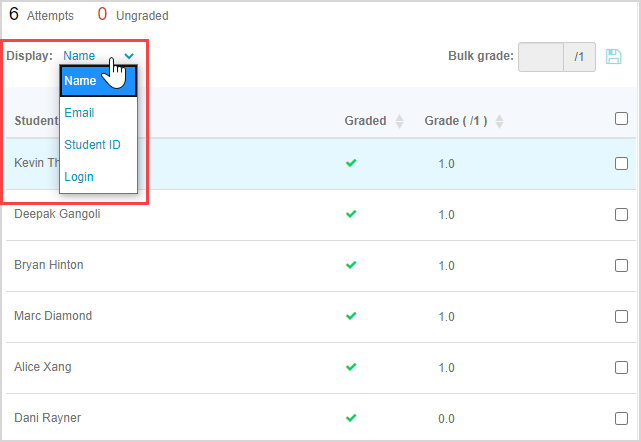
- Choose from:
- Name
- Student ID
- Login
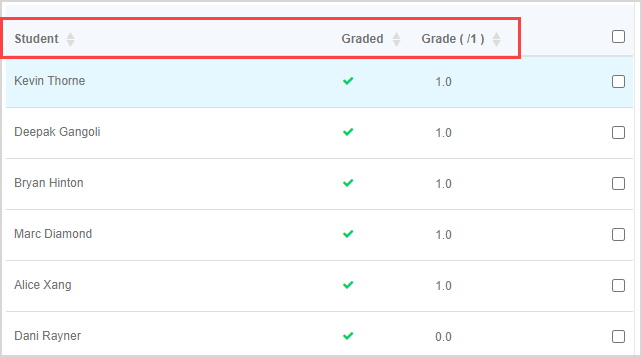
- Click on a column header in the Selection pane to toggle between the entries being sorted in ascending or descending order based on that column header.
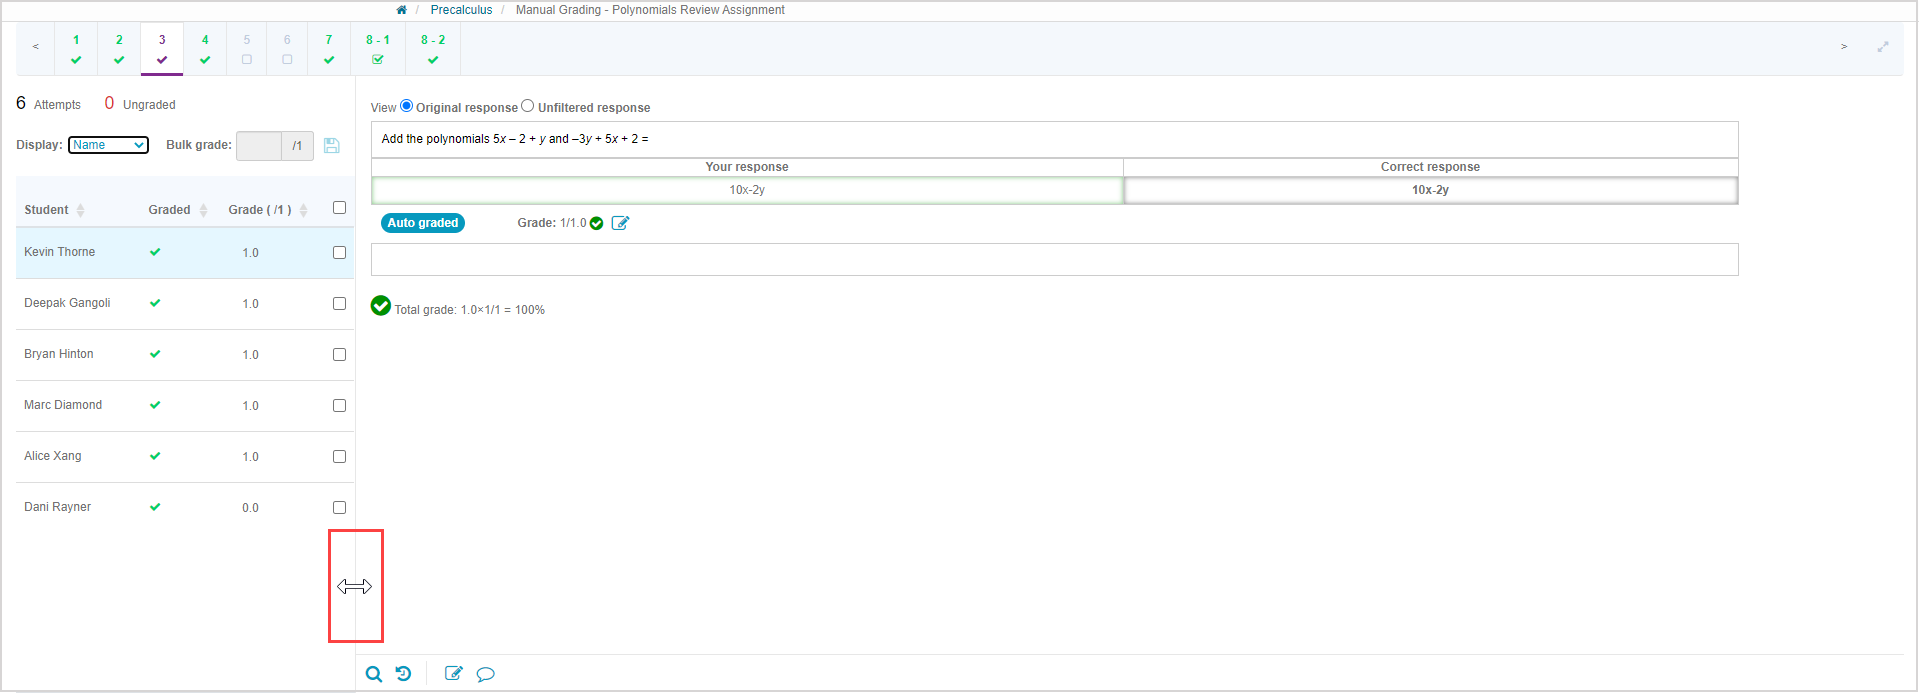
- Click-and-drag the vertical divider between the Selection pane and Details pane to resize these 2 panes as desired.
- Select a radio button to control how the student response is displayed within the Details pane:

- Annotated response — Displays the response to a question that has been manually graded (only available if the response has been manually graded).
- Original response — Displays the response as the student would have entered it in the response entry field.
- Unfiltered response — Displays the response as how it's stored in Möbius.
Preview a question
You can preview the version of the question that was seen by your students while reviewing their response.
In the preview window, you can also trial the question that the student would have seen.
To preview a question:
Select the question you want to investigate from the Question pane.

Select the student attempt that you want to investigate from the Selection pane.
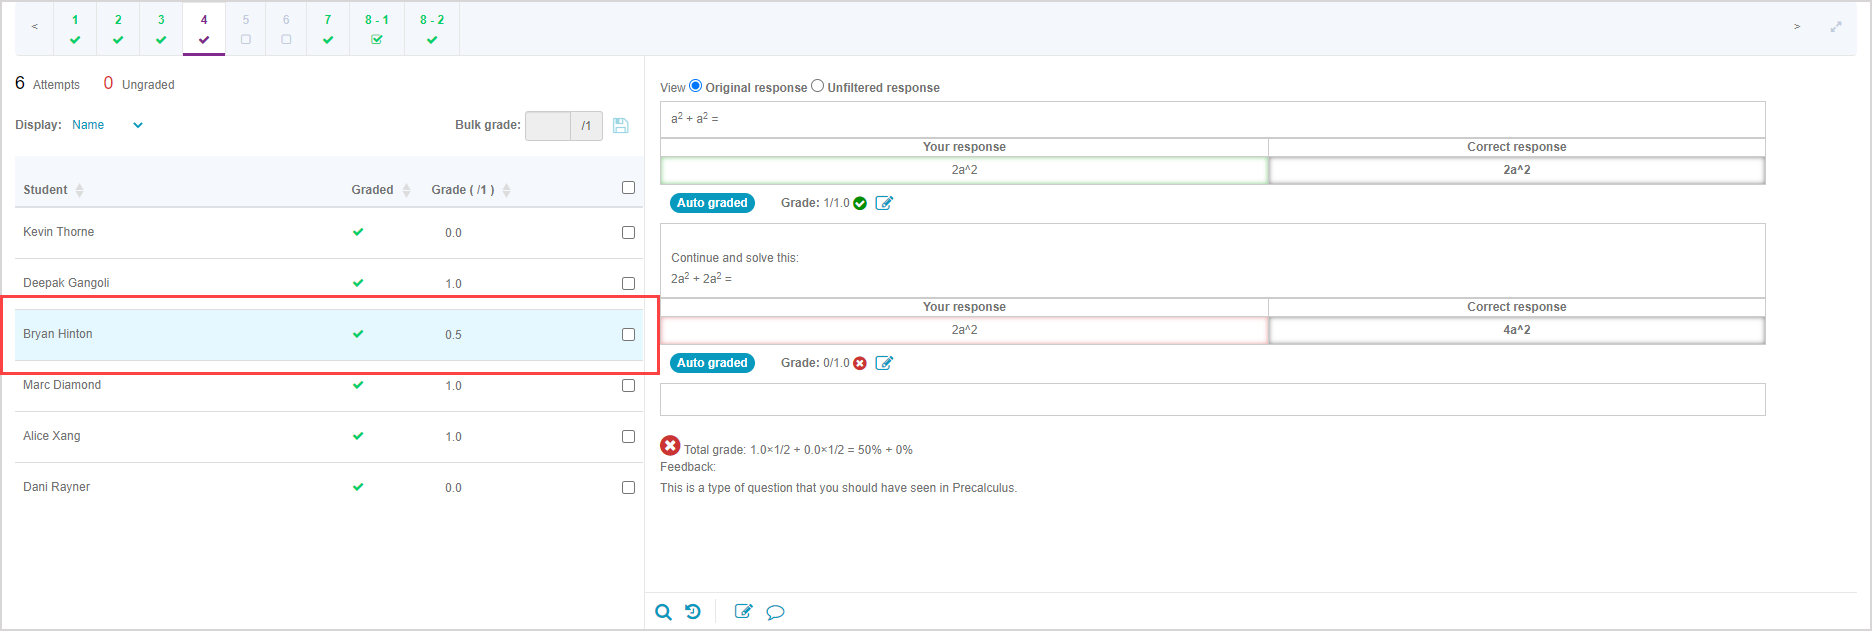
TIP: Press Shift + W to navigate up or Shift + S to navigate down the list of student attempts in the Selection pane.
Click the question preview icon
 from the Grade Manager tools in the Details pane to preview the question as the student would have viewed it during their attempt.
![]()
The question is previewed in a new window. The question preview is a snapshot of all aspects of the question that the student would have seen before clicking to submit their response (all components, variables, available hints, and question text). You can also attempt the question yourself.
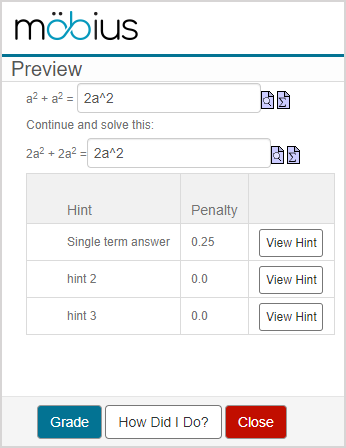
TIP: If you are previewing a question, you can submit your response in the response field of the preview window and then click:
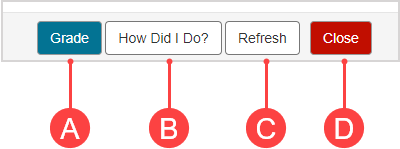
A.Grade — Reveals the correctness of your response as well as the correct response (and feedback if feedback is enabled).
B.How Did I Do? — Only indicates the correctness of your response.
C.Refresh — Provides a variation of the same question if the question was designed using an algorithm.
D.Close — Exit the question preview and return to the Grade Manager.
Grade an individual attempt
Individual student attempts can:
- Be awarded a grade (if manual grading is required).
- Have their grades edited (if a grade has already been awarded either manually or by Möbius).
TIP: Press Shift + W to navigate up or Shift + S to navigate down the list of student attempts in the Selection pane.
You can award or edit grades for individual student attempts by defining the:
- Part grade for a specific student response component in a question
- Overall grade in the Details pane (using the Grade Manager tools)
- Overall grade in the Selection pane
NOTE: Anytime an overall grade is manually edited, the total grade calculation for the question is ignored and replaced with the following comment in the Details pane: The overall grade awarded for this question has been manually overridden.
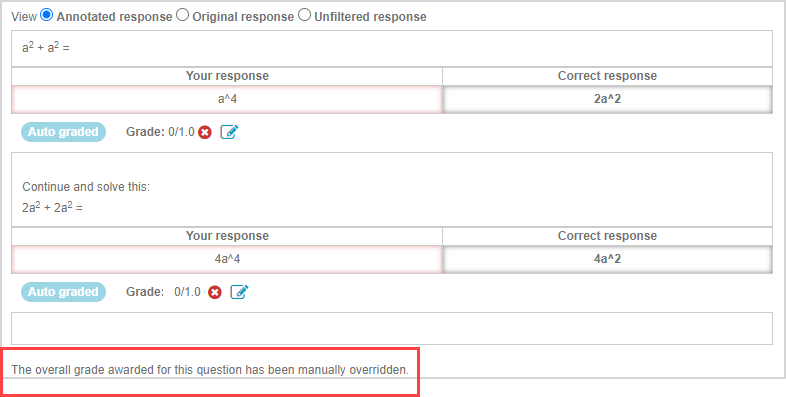
Anytime a part grade is edited, the total grade calculation for the question reappears and is used to calculate the overall grade.
TIP: Certain question types require manual grading and can't be automatically graded by Möbius. Check out Perform manual grading for help with general manual grading tasks, or, for specific questions types, check out:
NOTE: Response correctness icons are displayed with each student response and total grade calculation (no correctness icon will be displayed with the total grade calculation if it's overridden by a manual overall grade entry). When a response receives full marks, the correct icon![]() is displayed with the response. If all the student responses for the question are correct, the correct icon
is displayed with the response. If all the student responses for the question are correct, the correct icon![]() is then also displayed with the total grade calculation.
is then also displayed with the total grade calculation.
![]()
When a student response is incorrect or only partially correct, the incorrect icon![]() is displayed with the response. If at least one of the student's responses is incorrect or only partially correct, the incorrect icon
is displayed with the response. If at least one of the student's responses is incorrect or only partially correct, the incorrect icon![]() is then also displayed with the total grade calculation.
is then also displayed with the total grade calculation.
![]()
When a student response requires manual grading, no correctness icon is displayed. If at least one student response component of the question requires a grade to be assigned through manual grading, the incorrect icon![]() is displayed with the total grade calculation.
is displayed with the total grade calculation.
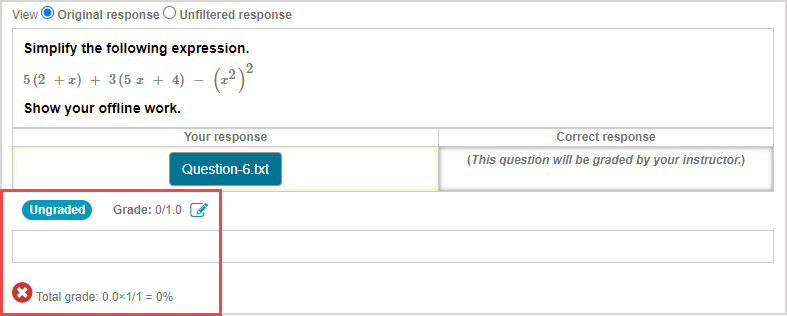
If a student response requires manual grading, the correctness icon will appear once a grade is manually assigned. The correctness icon for the total grade calculation will then update based on the part grades.
![]()
NOTE: Student responses within a question that require manual grading are indicated with the Ungraded tag.

Student responses within a question that have already been manually graded are indicated with the Manually graded tag.

Student responses within a question that have been automatically graded by Möbius are indicated with the Auto graded tag.

Manually overriding a response that was automatically graded by Möbius is indicated with the grayed out Auto graded tag. You can hover your cursor over a grayed out tag for a tool tip that informs you that the overall grade awarded for the question has been manually overridden.

Part grade for one student response
To award or edit the part grade for a specific response in the Grade Manager:
Click the Edit Part Grade icon
 associated with the student response that you want to grade.
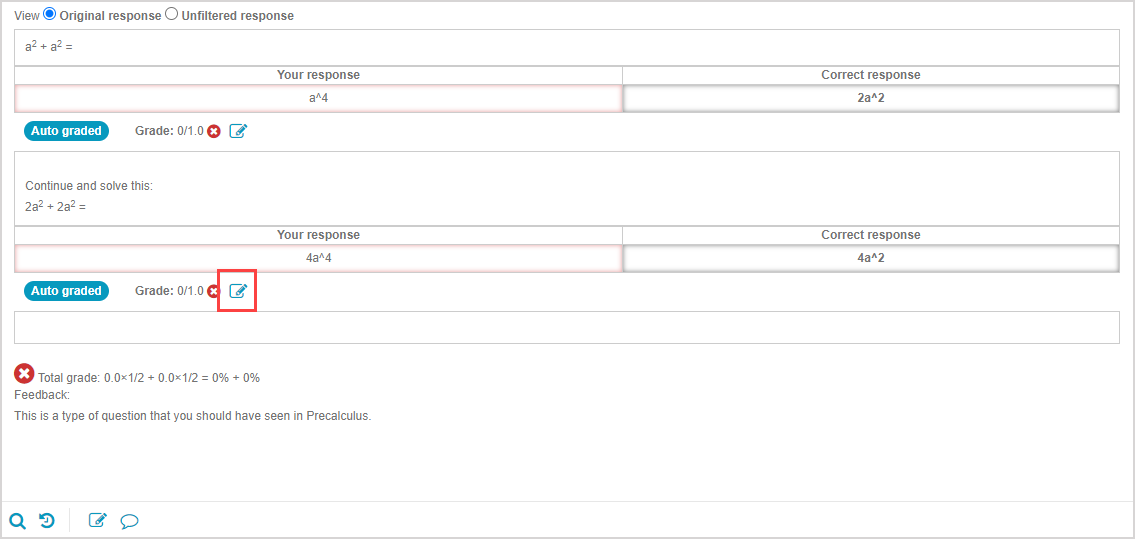
Enter a grade between 0.0 and the weight of the student response component.

Click the Save grade icon
 .
.

The assigned part grade for the response is displayed and the total grade calculation uses the part grade value(s) to calculate the overall grade for the question.
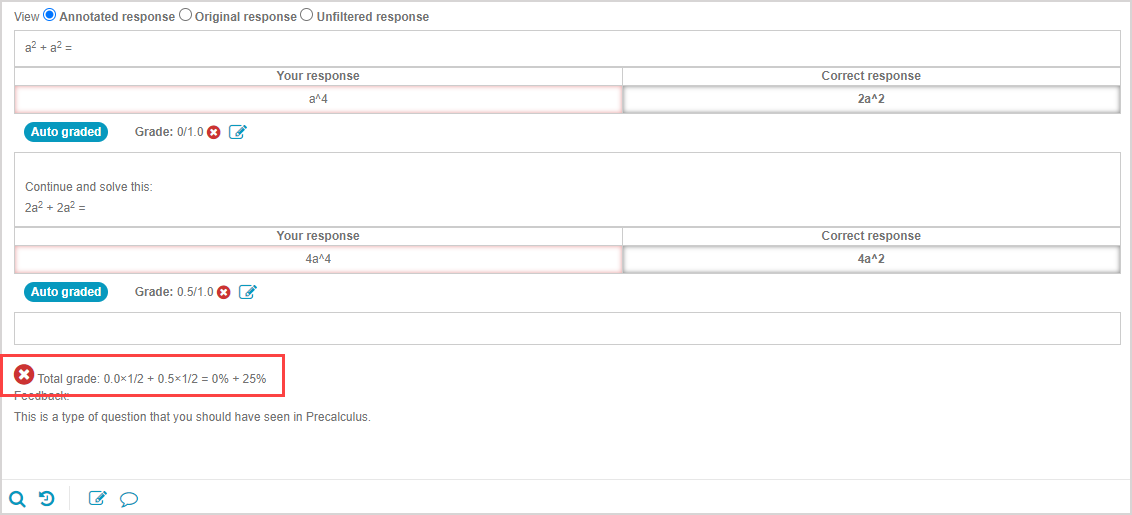
Overall grade in the Details pane
To award or edit the overall grade from the Details pane using the Grade Manager tools:
Click the Grade and note icon
 from the Grade Manager tools.
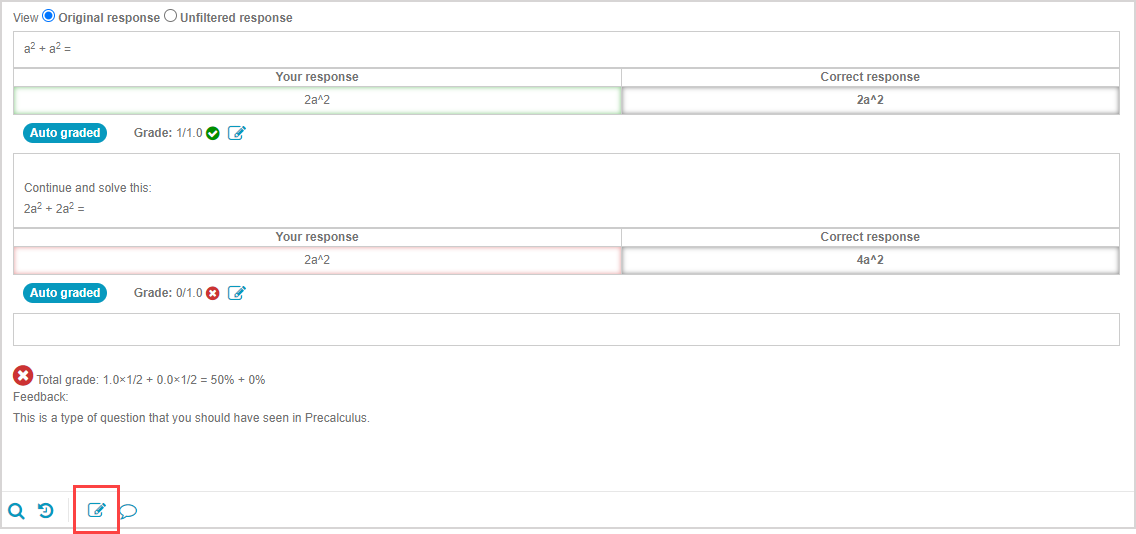
Enter a grade value for the overall question in the grade entry field.

(Optional) Add an internal grading note about this overall grade change for your records. This note is visible in the grade history for the student’s response but isn’t visible to students.

Click the Save grade and note icon
 .
.

The overall grade is updated in the Selection pane for the student's attempt.
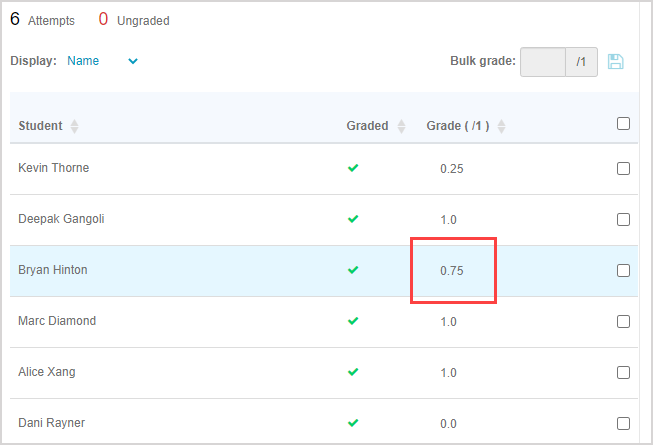
Overall grade in the Selection pane
To award or edit the overall grade from the Selection pane:
Hover your cursor over the student's grade value in the Grade column of the Selection pane to reveal the grade entry field.
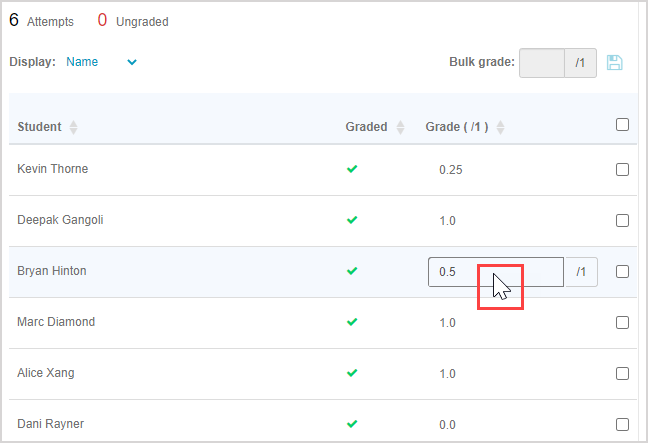
Click within the grade entry field and enter the new overall grade that you want to award the student for the question.

Click outside of the grade entry field to save the new overall grade.
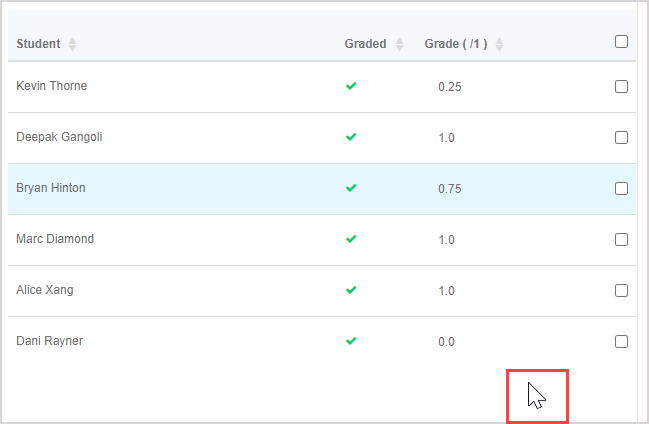
TIP: Alternatively, press Enter on your keyboard to save the new overall grade.
Bulk grade attempts
You can perform bulk grading of multiple attempts simultaneously from the Selection pane.
NOTE: Anytime an overall grade is manually edited, the total grade calculation for the question is ignored and replaced with the following comment in the Details pane: The overall grade awarded for this question has been manually overridden.

Anytime a part grade is edited, the total grade calculation for the question reappears and is used to calculate the overall grade.
To bulk grade attempts:
Select a question from the Question pane that you want to use to perform bulk grading.

Select the student attempt check boxes for all attempts that you want to assign the bulk grade value to.
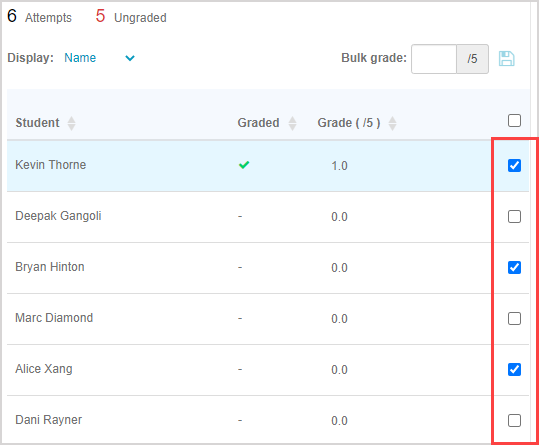
TIP: Press Shift + W to move up the list of attempts or Shift + S to move down the list of attempts in the Selection pane. Then press Spacebar to select the attempt when an attempt is reached that you want to include in bulk grading.
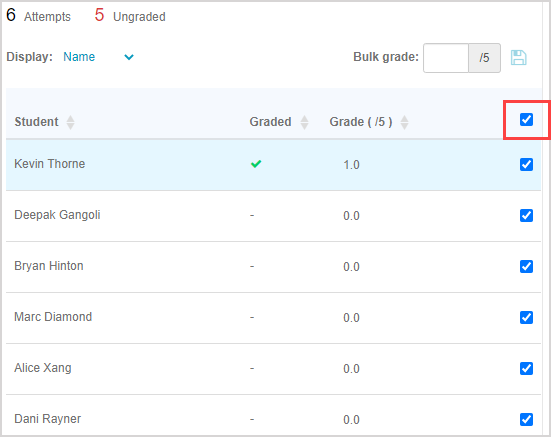
TIP: Select the check box in the header of the Selection pane to select all attempts at the question.
Enter the grade value that you want to award to the selected attempts.
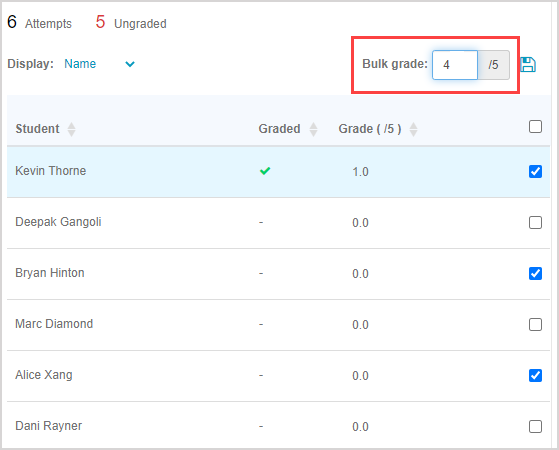
NOTE: Your entered value can’t exceed the question total.
NOTE: The bulk grade field is only available when at least one attempt check box is selected.
Click the save icon
 .
.

Click Confirm to apply your bulk grade value to the selected attempts.
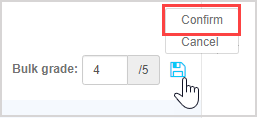
IMPORTANT: Confirming this bulk grade value can’t be undone.
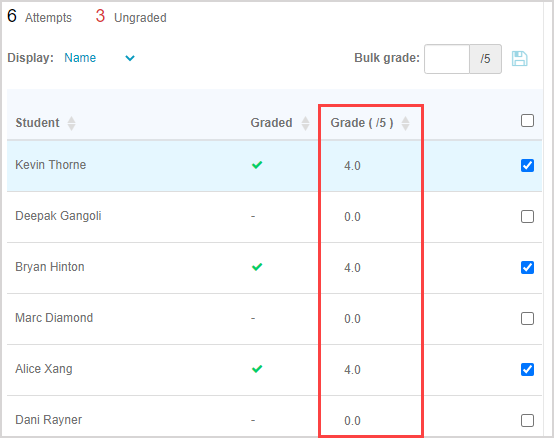
The total grades for all of the selected attempts are updated in bulk with your defined overall grade.
Add grading comments
After selecting a question from the Question pane, you can add 2 types of grading comments from the Grade Manager’s Activity Grading View:
- Grade history notes
- Student-facing comments
Add a grade history note
Grade history notes are internal comments that are only visible to instructors when the grade history is viewed.
These notes are helpful to indicate why grades were edited or other notes about the student's response unrelated to a grade change.
TIP: If the question that you’re adding a grade history note to has multiple student response components, you may want to specify in your note which of the student's responses your message applies to.
To add a grade history note:
Click the Grade and note icon
 from the Grade Manager tools in the Details pane of the selected attempt.
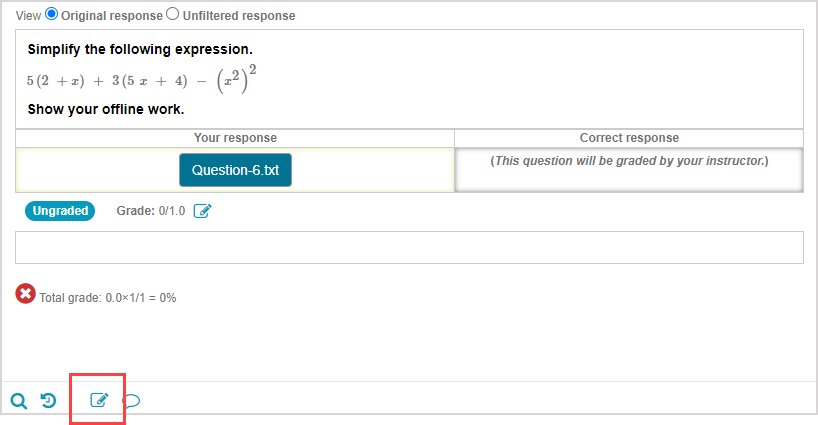
Enter your custom note in the text box.

NOTE: You don’t have to edit the overall grade value when entering a grade history note; you can leave the overall grade unchanged and only enter a note. Or, you can enter a note at the same time as editing the overall grade to remind you of the reasoning behind changing the overall grade.
Click the save icon
 .
.

Your internal grading note is added to the grade history log and is visible when the grade history is viewed.
Add a student-facing comment
Student-facing comments are custom comments that are visible to the student when they’re reviewing their graded response from their Gradebook.
These comments are customized feedback for a student about their specific response(s) to a question.
TIP: If the question that you’re inserting a student-facing comment into has multiple student response components, be sure to specify in your comment which response your message applies to.
To add a student-facing comment:
Click the Comment for student icon
 from the Grade Manager tools in the Details pane of the selected attempt.
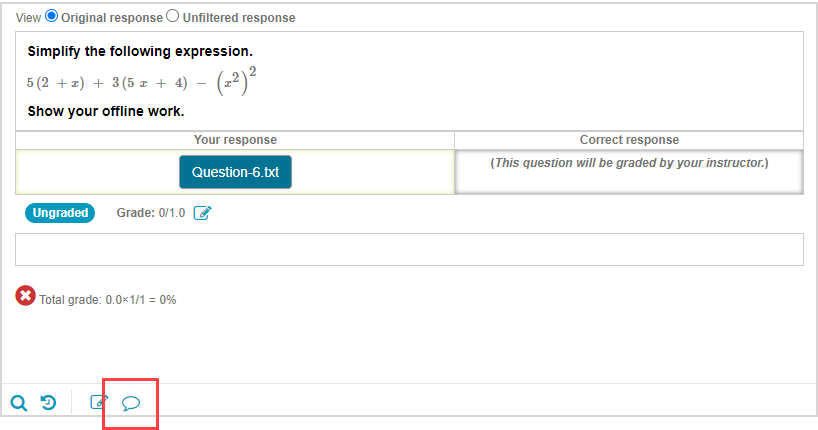
Enter your custom comment in the text box.

Click the save icon
 .
.

Your student-facing comment is now visible to the student in their Gradebook.

TIP: Repeat steps 1 to 3 to edit or delete the comment.
View grade history
The grade history for a question is a historical log of all overall and part grade changes as well as internal notes.
NOTE: The information in the grade history table isn't visible to students.
To view the grade history for an attempt:
Click the Grade history icon
 from the Grade Manager tools in the Details pane of the selected attempt.

The grade history data table for the attempt is revealed:
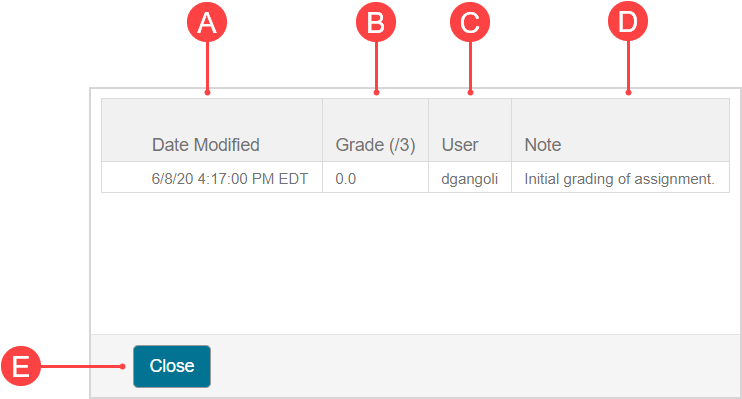
A.Date Modified — Date and time stamp of when the grade editing or note event occurred.
B.Grade — Grade value submitted at the time stamp of A.
C.User — Username (login) of the user who edited the grade or added a note.
D.Note — Summary statement of why the grade was edited or a general grading message.
E.Close — Click Close to exit the grade history and return to the Gradebook.
NOTE: The username that appears in the (C) User column will be the student if the grading event is when the student submitted the activity for grading.
NOTE: Text that you may come across when viewing the (D) Note column of a student's grade history are:
- Custom notes submitted by the user performing the review.
- Force graded assignment — Indicates that the activity was force graded.
- Grade assigned manually by instructor — Indicates that the instructor edited the overall grade without a custom note.
- Initial grading of assignment — Indicates that the activity was submitted for grading by the student.
- Regrading of question against current revision — Indicates that activity regrading resulted in the edited grade.
- Update part grade — The part grade for a student response in this question was edited.